Custom Scripting module
You can use this module to call a Python script during the acquisition sequence. You must have at your disposal python scripts, structured with a template similar to that of the applications included in the inscoper-scripts resource provided with this module. In this guide, you may select any script provided as part of this resource.
Python Environment Setup
Before running scripts, you must define which Python engine the software uses.
- Navigate to .
- Select Script Settings from the left-hand menu.
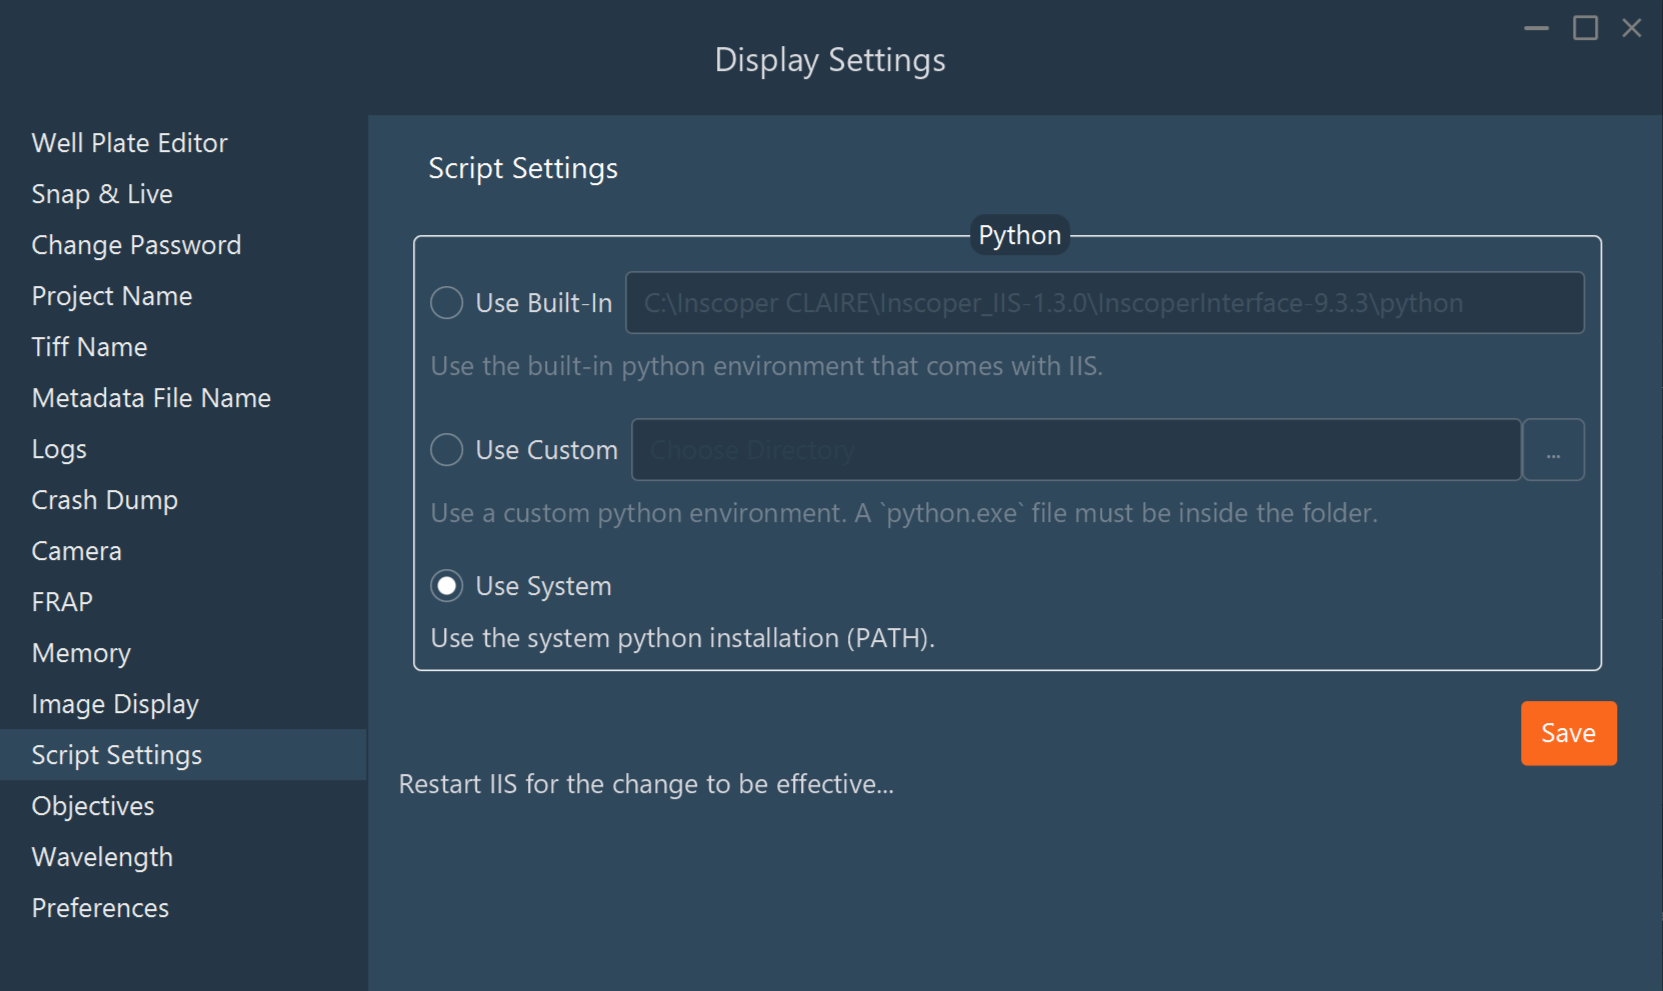
- Choose your environment:
- Use Built-In (recommended): Uses the Python version included with the installation. This contains standard image analysis packages.
- Use Custom: Select a local directory
containing a specific
python.exe.- Critical Requirement: If using a custom environment
(like Conda), you must ensure the package
jepis installed, or the script will fail.
- Critical Requirement: If using a custom environment
(like Conda), you must ensure the package
- Use System: Uses the global Python version installed on your OS.
- Restart I.I.S. for these changes to take effect.
Note on Installing Packages: If you need extra libraries in the
Built-In environment:
- Open a console/terminal in the I.I.S. installation folder.
- Navigate to the
pythonfolder. - Run:
./python.exe -m pip install <package_name>
Creating a New Script Application
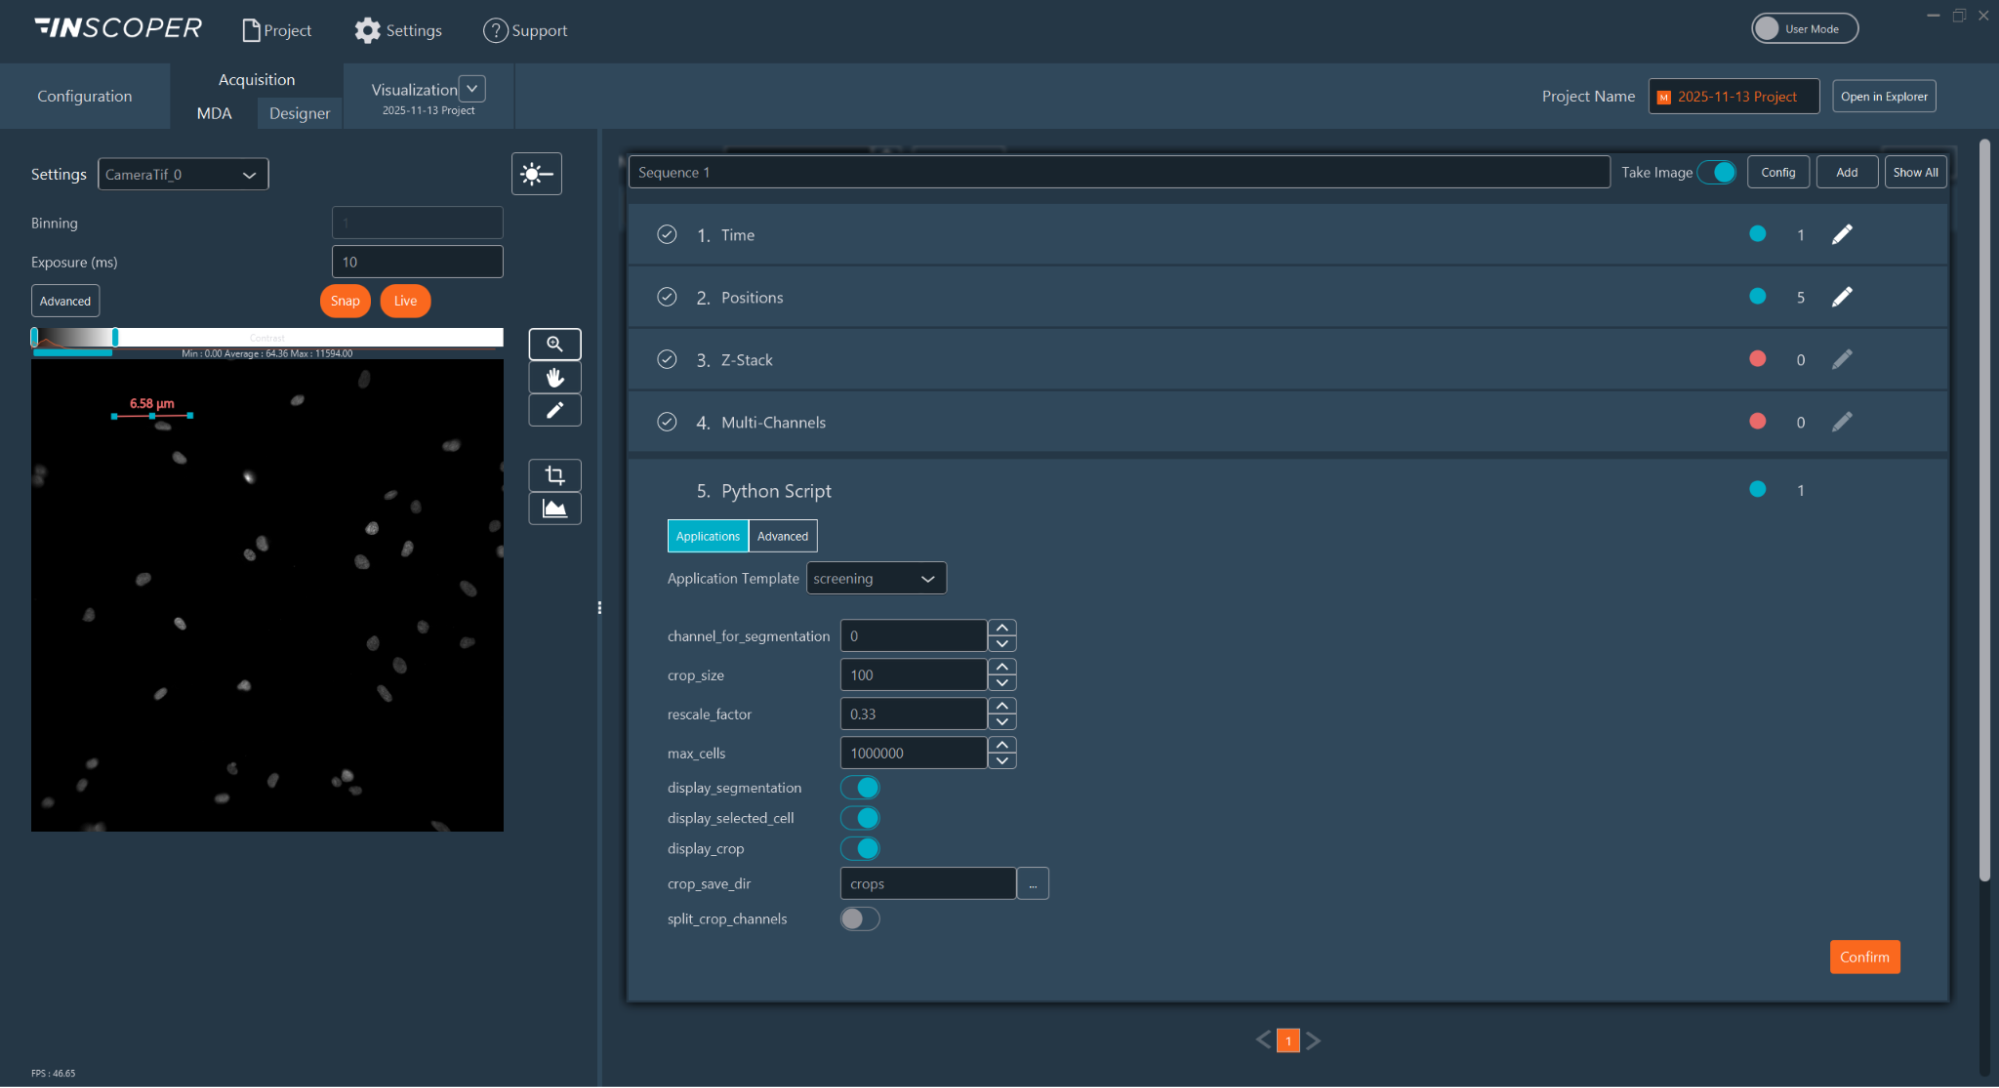
- Go to the Acquisition tab and select MDA (Multi-Dimensional Acquisition).
- Expand the Python Script module and toggle
Advanced on.
Figure 1. Advanced Script importation tab 
- Click the “…” button (next to "Re-scan File")
and browse for your
.pyfile.
- Click the “…” button (next to "Re-scan File")
and browse for your
- Map Python Functions to Inscoper Imaging Software (I.I.S)
Functions: You must tell the system which part of your code
handles images and which part handles processing. Then you must map the
script's arguments to I.I.S. hardware or settings.
- Step A: Image Provider: Select the function
in your script that fetches images (e.g.,
fetch_images).- Map Arguments: Pair the script variable
new_imageto the TypeIMAGES. In practice this pattern allows the software to send the last acquired image to the script. - Pair
channel_index to INT and set a default value (0). Channel indices coincide with the order of the channels in the multi-channels dimension.
Figure 2. Pair function arguments to valid types and default values 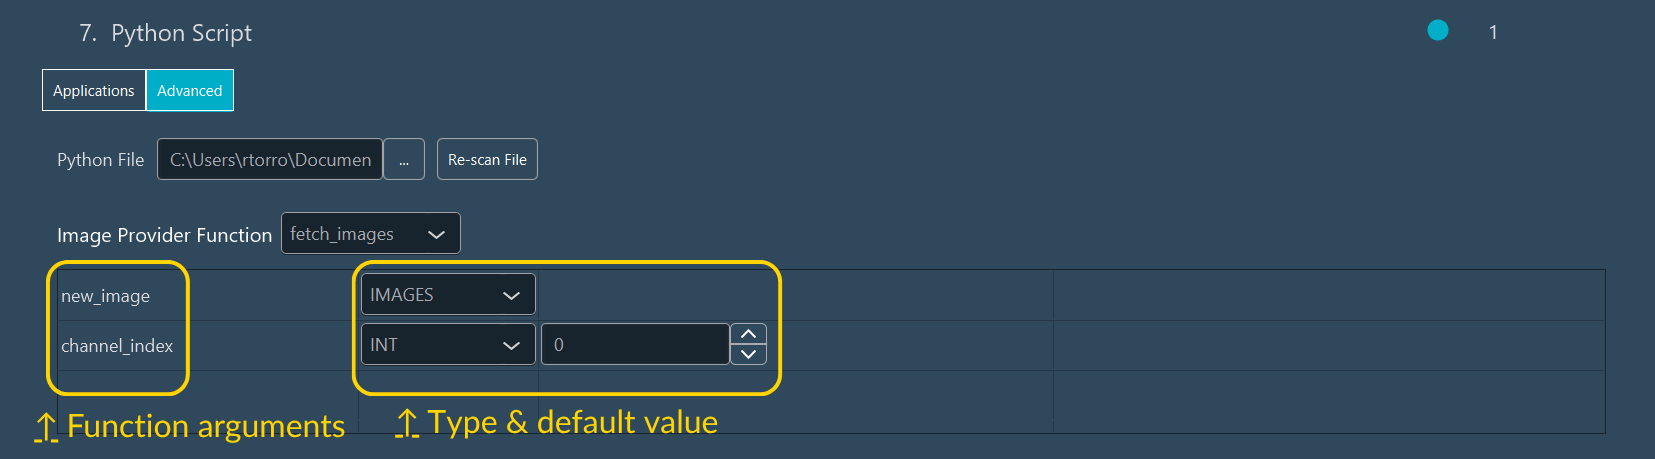
- Map Arguments: Pair the script variable
- Step B: Processing Function: Select the
function that analyzes the data (e.g.,
correlation_tracking).- Map Arguments: Pair the script variable
imagesto the TypeIMAGES. This variable received the images selected by the image provider function when entering the processing function. - Pair
stage_x_idto SUBDEVICEID and set a default value to the name of your X axis subdevice. This variable tells explicitly the script the name of the X axis subdevice for this system. - Pair
stage_y_idto SUBDEVICEID and set a default value to the name of your Y axis subdevice. - Pair
stage_z_idto SUBDEVICEID and set a default value to the name of your focus axis subdevice. - Pair
correct_zto BOOL and set a default value. - Pair
focus_on_motionto BOOL and set a default value. - Pair
show_plotsto BOOL and set a default value. - Pair
acquisition_contextto IIS_CONTEXT and set a default value. The IIS context allows the script to useful software functions (e.g. send a matplotlib figure to the software).
- Map Arguments: Pair the script variable
- Step C: Device Control: Set the Device
Control subdevices that should match with the outputs of the
processing function. If the function does not update devices, it
should not return anything and this part should be left blank. In
the tracking example, add your three subdevices
(
stage_x_id,stage_y_id,stage_z_id).
- Step A: Image Provider: Select the function
in your script that fetches images (e.g.,
- Save as Template
- Once mapped, click Save as Application Template.
- A pop-up will appear. Tick the boxes for parameters you
want visible to the end-user.
Figure 3. Generate an application template after importing a script 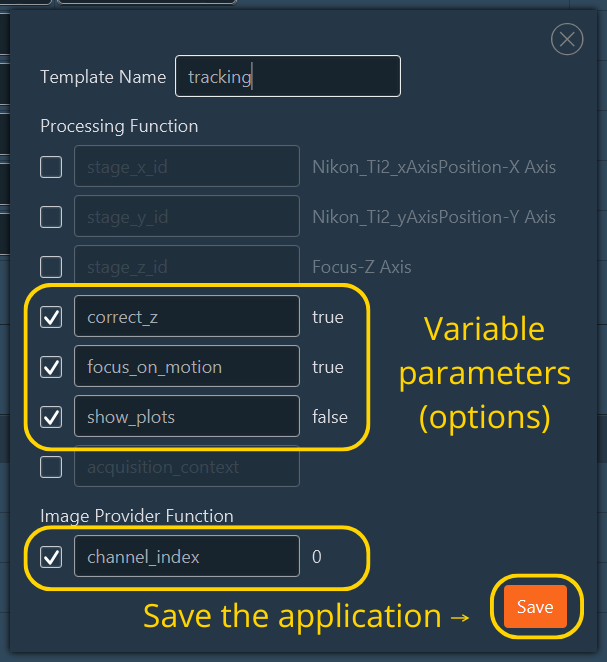
- Unticked parameters will be hidden and locked.
If your script outputs graphs or logs, you need to configure the display panel.
- Toggle Expert Mode (Top-right corner).
- In the Data Processing and Charts section, click Switch to Data Processor.
- Add the Console: Drag and drop the Feedback Console chart to the right
panel. This displays Python
print()statements. - Add Charts: If your script uses
display_figure(..., processor_name='name'):- Drag a Feedback Chart to the panel.
- Crucial Step: Rename this chart to match the
processor_namedefined in your Python script header (e.g., check theDATA_PROCESSORvariable in your code).
- Name this configuration (e.g., "tracking_charts") and click Add.
- Click Switch to Dimensions to return to the main view.
Running the Experiment
Once the template is saved, daily operation is simple.
- Go to the Application tab.
- Select your new template (e.g., "tracking").
- Adjust the visible control parameters.
- Ensure Data Processing and Charts is set to the layout you created in Part 3.
- Press Start Acquisition.