Software Autofocus
Use the Software Autofocus module to keep your sample in focus during the acquisition sequence. To calculate Z-axis corrections, the software captures autofocus evaluation frames on the fly. These frames are processed in memory and are not saved to the disk. For a hardware autofocus that holds focus continuously, see Use the ASI CRISP Autofocus.
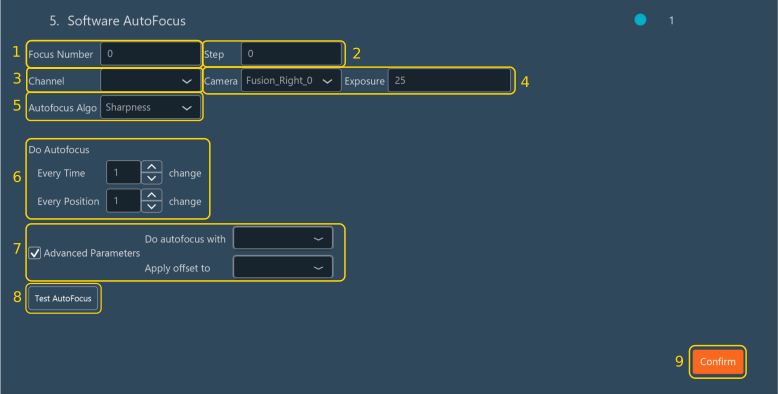
Configuring Software Autofocus
- Specify the number of Z-planes to acquire and analyze in the Focus Number field. Use an odd number: the planes are distributed symmetrically around the current Z-position, and only an odd number includes a plane at the current Z-position itself.
- Define the Z-axis step size in the Step field (in the units specified in the software settings) to determine the distance between successive planes. The scanned range is (Focus Number − 1) × Step, centered on the current Z-position. For example, 11 planes with a 2 µm step scan from −10 µm to +10 µm.
- Select the active Channel used to evaluate focus.
- Select the active Camera and specify the sensor Exposure time (in ms) for the autofocus capture frames.
-
Select the autofocus algorithm from the Autofocus Algo dropdown menu:
- Maximum: Optimized for bright fluorescent signals.
- Sharpness: Optimized for dense morphological structures (such as brightfield or phase contrast), where the algorithm detects the highest high-frequency contrast.
Note
The sharpness algorithm is computed exclusively on a central region measuring 20% of the image width and 20% of the image height, that is, 4% of the image area. Center the autofocus on a field where this region contains sample structures.
-
Under Do Autofocus, specify the execution frequency of the autofocus routine. Enter the interval in the Every Time and Every Position fields to define how often the routine executes relative to time points and stage positions. The routine runs at each position whose index, counted from 0, is a multiple of the Every Position value. For example, with 25 positions and an interval of 3, the routine runs at positions 0, 3, 6, …, 24.
-
Select the Advanced Parameters checkbox to configure mechanical device integration:
- Under Do autofocus with, select the mechanical device that drives the autofocus routine (such as a fast piezo stage or the microscope internal Z-drive).
- Under Apply offset to (optional), select the mechanical device to which the system applies the calculated Z-offset.
If Advanced Parameters is not selected, the autofocus routine uses the device selected as the Z Axis in the Axis Editor.
-
Click Test AutoFocus to test the autofocus protocol on the sample immediately.
- Click Confirm to save the configuration.
Note
If a software mirror is applied to the camera, the autofocus image does not have the same orientation as the live view.
Software Autofocus in a Tiling
In a Tiling, each tile counts as one position for the Every Position interval, and the position index runs continuously across all the tilings of the sequence.
All the tiles of one tiling share a single focus reference. Each tile is acquired at this reference plus its own offset from the Focus Map, if one is defined. When the autofocus runs on a tile, the correction is applied to the shared reference:
- The correction applies to the tile on which the autofocus runs and to all the following tiles of the same tiling.
- The correction is kept for the following time points.
- The relative Z-differences defined by the Focus Map are preserved: the whole interpolated surface moves up or down.
- The corrections accumulate. The next autofocus scans around the corrected position.
As a consequence, a single incorrect autofocus result affects every tile acquired until the next autofocus, and the next autofocus can only recover if the correct focus plane lies within its scanned range.
For discrete Positions, each position keeps its own focus reference, and the correction applies only to the position on which the autofocus runs. Positions that share the same group name share a single focus reference, as the tiles of a tiling do.