Saving Images and Metadata
The saving interface configures the destination path and data architecture for the automated sequence outputs.
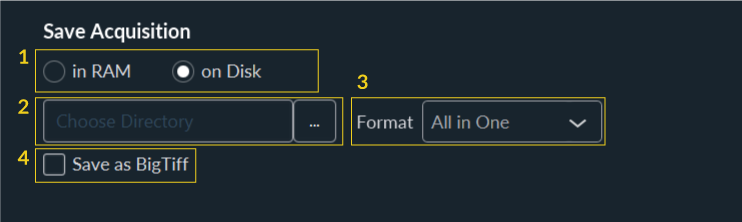
Configure how the acquired images and metadata are handled:
-
Select the data storage destination:
- RAM: (Not recommended for prolonged acquisitions). Data stored in RAM is volatile and is lost if the application closes or the system crashes. Use only for temporary test captures.
- Hard disk, SSD, or Server: (Recommended). Writes data to a physical drive or network storage.
-
Specify the destination folder path.
-
Choose the image saving format:
- All in one file: Combines the dimensional dataset (Z-stacks, Time points, Channels) into a single, multi-page image file.
- One TIFF per image: Saves every captured frame as a discrete TIFF file (e.g.,
Image_T01_Z03_C01.tiff). Use this if post-processing tools require sequential files instead of multi-page containers.
-
(Optional) Check .bigTiff to support files exceeding the standard 4GB legacy TIFF limit (recommended for large volumetric datasets).
Tip
To configure standardized file naming conventions before initiating an automated acquisition, refer to the Display Settings guide.