Calling Scripts in Inscoper I.S.
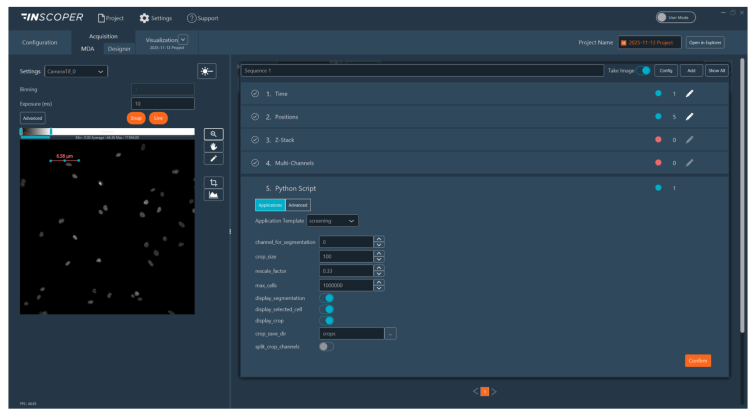
The Python Scripting module enables the execution of custom Python algorithms within an MDA sequence.
To ensure compatibility, scripts must adhere to the templates provided in the inscoper-scripts local package. You may use the included sample scripts for testing.
Python Environment Setup
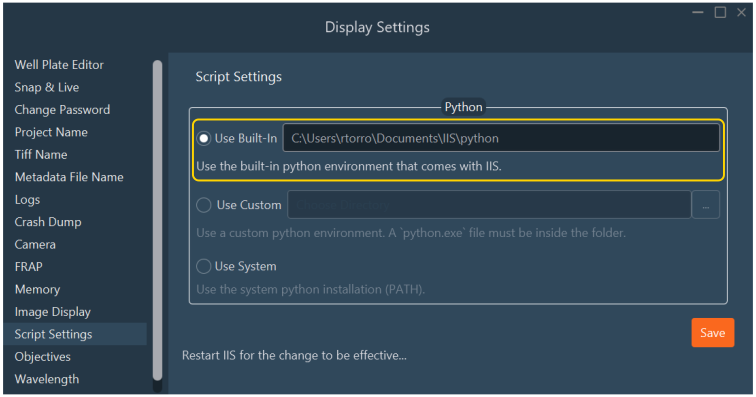
Before running a script, select the Python environment the software uses.
- Navigate to Settings > Display Settings.
- Select Script Settings from the left-hand navigation pane.
-
Choose your preferred execution environment:
- Use Built-In (recommended): Uses the Python environment bundled with the software installation. It includes the standard (non-GPU) data science and image analysis packages.
- Use Custom: Point the software to a specific, user-managed local Python executable (
python.exe). Note: This advanced route explicitly requires the jep library (see warning below). - Use System: Uses the Python installation found in the PATH of the operating system.
-
Restart Inscoper I.S. to fully instantiate the environment changes.
Jep Package Required for Custom Environments
If you elect to use a custom environment (such as a specific Conda environment), the jep (Java Embedded Python) package is strictly required to bridge the software architectures.
Install it by activating your target environment and running:
Expanding the Built-In Environment
If your custom script requires specialized statistical or biological libraries not included in the standard distribution:
- Open a command line terminal within the I.I.S. installation directory.
- Navigate to the nested
pythonsubdirectory. - Execute the standard pip installation command:
Importing and Mapping a Script Application
Once your Python interpreter is set, you can load your script into the MDA sequence definition.
- Navigate to the central Acquisition tab and select the MDA (Multi-Dimensional Acquisition) sub-tab.
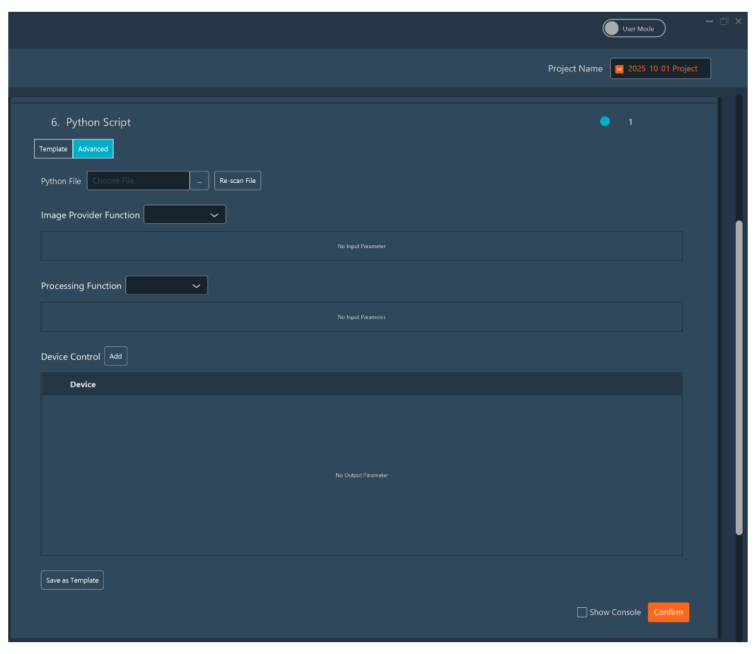
- Expand the Python Script module panel and toggle the Advanced switch to enable this mode.
- Click the "..." button adjacent to Re-scan File, browse to the
inscoper-scriptslocal package, and select your specific.pyscript.
-
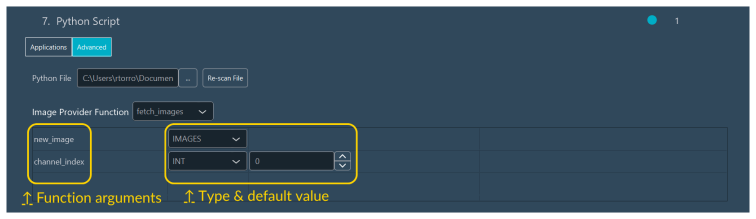
Map Python functions to I.I.S. parameters. Define which function handles image fetching (image provider) and which handles heavy-computations (processing), then map the functions' arguments to the proper type and value.
- Step A (image provider): Select the script function responsible for fetching images (e.g.,
fetch_images).- Map Arguments: Map the script variable
new_imageto theIMAGESdata type. This allows the software to pass the most recently acquired image to your script. - Map
channel_indextoINTand assign a default value (e.g.,0). These channel indices correspond to their order within the Multi-channels dimension.
- Map Arguments: Map the script variable
-
Step B (processing function): Select the function responsible for data analysis (e.g.,
correlation_tracking).- Map Arguments: Map the
imagesvariable to theIMAGEStype. This variable receives the images curated by the Image Provider function. - Map hardware identifiers (e.g.,
stage_x_id,stage_y_id,stage_z_id) to theSUBDEVICEIDtype and set default values matching your hardware. - Map logical switches (e.g.,
correct_z,focus_on_motion,show_plots) toBOOLand define initial states. - Map
acquisition_contexttoIIS_CONTEXT. This provides access to internal software APIs, such as renderingmatplotlibfigures in the UI (see Interacting with Inscoper I.S.).
- Map Arguments: Map the
-
Step C (device control): Declare any hardware sub-devices that will be updated by your processing function's outputs (it should match symmetrically with the return values of the processing function, e.g. if the processing function returns a tuple of new 'x', 'y', and 'z' values, then you should declare the X, Y, and Z sub-devices here). If your function only logs data without modifying hardware, leave this blank.
- Step A (image provider): Select the script function responsible for fetching images (e.g.,
-
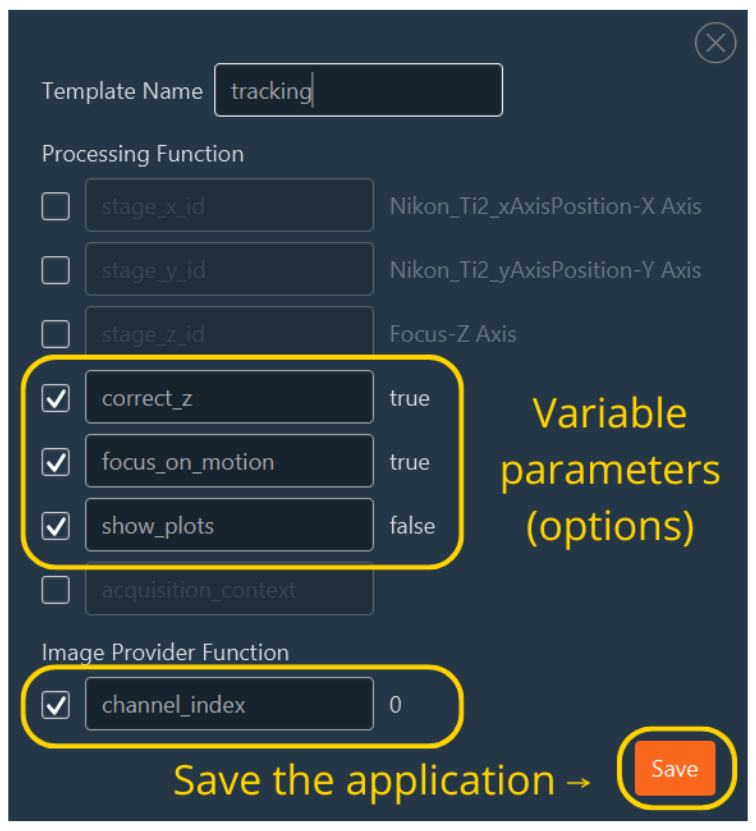
Save as a Reusable Template
- Once mapping is complete, click Save as Application Template.
- In the dialog box, select which parameters should remain editable by the user.
- Unselected parameters will be hardcoded to their default values and hidden from the UI.
Configuring the UI for Script Visualization
If your Python script is designed to output interactive visual graphs (via matplotlib) or text logs to the console, you must configure a data processor to receive this data.
- Enable Expert Mode using the top-right interface toggle.
- Within the Data Processing and Charts operational section, click Switch to Data Processor.
- Enable Console Logging: Drag the Feedback Console module from the library into the right-hand panel workspace. This active console captures and displays all standard Python
print()logging outputs. -
Enable Graphical Output: If your script pushes a figure with
display_figure(..., processor_name='name'):- Drag a Feedback Chart module into the right-hand panel workspace.
- Rename this chart element in the interface so that it matches the
processor_namestring used in your script exactly. The figure does not appear otherwise.
-
Save this complete charting layout with a descriptive, logical name and click Add.
- Click Switch to Dimensions to return to the standard sequence configuration window.
Executing the Scripted Experiment
Executing a templated script is designed for operational simplicity.
- Navigate to the Application tab.
- Select your saved template from the dropdown list.
- Adjust any exposed control parameters.
- Verify that the Data Processing and Charts menu selection matches the layout required by the script.
- Click Start Acquisition to initiate the sequence.